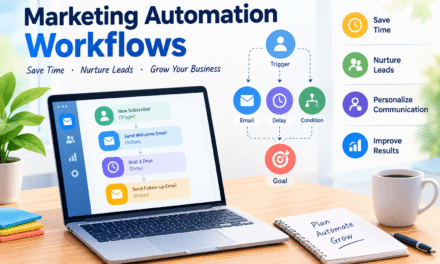
An email automation workflow allows you to send the right message to the right person based on their actions, interests, or stage in the customer journey. Once the workflow is set up, many emails can be sent automatically without requiring you to manage every subscriber individually.
In this guide, you will learn how to create an email automation workflow, what elements you need, and how to improve your results over time.
What Is an Email Automation Workflow?
An email automation workflow is a series of automated actions that send emails based on specific triggers and conditions.
For example, imagine that someone subscribes to your newsletter. Instead of manually sending them a welcome email, you can create a workflow that automatically sends:
- A welcome email immediately
- A helpful email after two days
- A product or service recommendation after four days
- A follow-up email after one week
The subscriber moves through the workflow automatically according to the rules you create.
A workflow can be simple, such as a three-email welcome sequence, or more advanced, with different paths depending on how subscribers interact with your emails.
Why Should You Use Email Automation?
Email automation can save time while helping you communicate with subscribers consistently.
1. Save Time
You don’t need to manually send the same emails repeatedly. Once your workflow is created and tested, the email platform can handle the delivery automatically.
2. Improve Customer Experience
Subscribers can receive useful information when it is relevant to them. For example, a new subscriber can receive a welcome email immediately instead of waiting for your next newsletter.
3. Nurture Leads
Not every subscriber is ready to buy immediately. Automated emails can educate potential customers and gradually build trust.
4. Increase Engagement
Relevant and timely emails can encourage subscribers to open emails, click links, read your content, and take other desired actions.
5. Create Personalized Journeys
Automation allows you to create different experiences based on subscriber behavior. Someone who clicks a particular link can receive content related to that topic.
Step 1: Define Your Goal
Before creating your workflow, decide what you want it to accomplish.
Your goal should be specific. Some common email automation goals include:
- Welcoming new subscribers
- Promoting a product
- Nurturing leads
- Recovering abandoned carts
- Educating customers
- Onboarding new users
- Re-engaging inactive subscribers
- Promoting a webinar or event
For example, if your goal is lead nurturing, your workflow could educate subscribers first and introduce your product later.
Having a clear goal makes it easier to decide what emails to create and when to send them.
Step 2: Identify Your Target Audience
Your workflow should be designed for a specific audience or subscriber segment.
Think about:
- Who are your subscribers?
- What problem are they trying to solve?
- What information do they need?
- What products or services interest them?
- Where are they in the buying journey?
For example, a person who has just downloaded a free guide should not necessarily receive the same emails as an existing customer.
Segmentation can help you create more relevant automated journeys.
Step 3: Choose the Trigger
The trigger is the event that starts your workflow.
Common triggers include:
- A person subscribes to your email list
- Someone downloads a lead magnet
- A customer makes a purchase
- Someone clicks a particular link
- A subscriber visits a specific page
- A person joins a particular segment
- A customer abandons a shopping cart
For a welcome workflow, the trigger could be “subscriber joins the email list.”
Once that event occurs, the automation starts.
Step 4: Plan Your Email Sequence
Now decide which emails you want to send.
Don’t create emails randomly. Each message should have a purpose.
For example, a simple welcome workflow could look like this:
Email 1 – Welcome
Send immediately after signup. Thank the subscriber and deliver the promised resource.
Email 2 – Helpful Content
Send after two days. Provide useful information related to the subscriber’s interests.
Email 3 – Problem and Solution
Send after another two or three days. Explain a common problem and show how your product, service, or method can help.
Email 4 – Recommendation
Send after several days. Introduce a relevant product or service.
Email 5 – Follow-Up
Send later to encourage the subscriber to take the next step.
The exact number of emails and timing will depend on your audience and objective.
Step 5: Write Valuable Emails
Automation does not mean your emails should feel robotic.
Each email should provide something useful to the subscriber.
Focus on:
- A clear subject line
- A strong opening
- One main message
- Useful information
- Simple language
- A clear call to action
Avoid trying to accomplish too many things in one email.
For example, if your email is designed to encourage readers to visit a blog post, focus on explaining why that article is useful and give them one clear link to read it.
Step 6: Add Delays Between Emails
Sending several automated emails immediately can overwhelm subscribers.
Use delays to create a natural sequence.
For example:
Day 0: Welcome email
Day 2: Educational email
Day 4: Helpful tips
Day 7: Product recommendation
Day 10: Follow-up
The ideal timing depends on your audience and the type of business.
A welcome sequence for a free resource may work well with shorter intervals, while a high-consideration B2B purchase may require more time.
Step 7: Add Conditions and Branches
More advanced workflows can change based on subscriber behavior.
For example:
Did the subscriber click the product link?
- Yes: Send a product-focused follow-up.
- No: Send another educational email.
You can also create branches based on purchases, email engagement, interests, or subscriber segments.
This makes the workflow more personalized because subscribers don’t all have to follow exactly the same path.
Step 8: Add a Clear Call to Action
Every automated email should have a clear purpose.
Your call to action might ask subscribers to:
- Read a blog post
- Download a guide
- Watch a video
- Register for a webinar
- Start a free trial
- Book a consultation
- Purchase a product
Try to avoid giving subscribers too many competing actions.
For example, instead of asking readers to download a guide, visit three blog posts, follow you on social media, and buy a product in the same email, focus on the most important action.
Step 9: Test Your Workflow
Before activating your automation, test the entire workflow.
Check:
- Subject lines
- Email content
- Links
- Images
- Personalization fields
- Timing
- Mobile appearance
- Trigger conditions
- Segmentation
- Calls to action
Send test emails to yourself or members of your team.
Also check what happens when a subscriber doesn’t open an email, clicks a link, makes a purchase, or meets another condition in the workflow.
Testing can help you identify problems before they affect real subscribers.
Step 10: Monitor Your Results
Creating the workflow is not the end of the process.
You should regularly review its performance.
Important metrics include:
Open Rate
This shows how many recipients opened your emails. However, open rates can be affected by privacy features and tracking limitations, so don’t evaluate your entire campaign using this metric alone.
Click-Through Rate
This measures how many subscribers clicked links in your emails. It can help you understand whether your content and calls to action are generating interest.
Conversion Rate
This measures how many people completed your desired action, such as making a purchase or signing up for a service.
Unsubscribe Rate
A high unsubscribe rate may indicate that your emails are too frequent, irrelevant, or not meeting subscriber expectations.
Revenue or Leads Generated
For business-focused workflows, look beyond engagement metrics and measure the actual results generated by the automation.
Examples of Email Automation Workflows
There are many types of workflows you can create.
Welcome Workflow
Trigger: New subscriber
Sequence:
- Welcome email
- Free resource
- Helpful educational content
- Product introduction
- Follow-up
Lead Nurturing Workflow
Trigger: Lead downloads a resource
Sequence:
- Deliver the resource
- Explain the problem
- Share useful tips
- Provide a case study
- Introduce your solution
- Follow up
Abandoned Cart Workflow
Trigger: Customer adds a product to their cart but doesn’t complete the purchase
Sequence:
- Cart reminder
- Product benefits
- Final reminder
Re-Engagement Workflow
Trigger: Subscriber has not engaged for a certain period
Sequence:
- Reminder email
- Valuable content
- Preference update option
- Final re-engagement message
Best Practices for Email Automation
Keep these practices in mind when building your workflows:
Start simple. You don’t need a complicated automation when you’re starting out. Begin with one useful workflow and improve it over time.
Segment your audience. Different subscribers may have different needs, so avoid sending every person the same automated sequence.
Focus on value. Don’t make every email a sales pitch. Educational and useful content can help build trust.
Set expectations. Let subscribers know what type of emails they will receive and how frequently they can expect them.
Use personalization carefully. Using a subscriber’s name or interests can make emails more relevant, but personalization should feel natural.
Review your workflow regularly. Your products, offers, links, and audience needs can change. Review your automation periodically to make sure everything is still accurate.
Final Thoughts
Creating an email automation workflow doesn’t have to be complicated. Start by defining your goal, identifying your audience, choosing a trigger, and planning a useful sequence of emails.
Then add appropriate delays, conditions, and calls to action. Before launching the workflow, test every step and monitor the results after it goes live.
The most effective automation workflows don’t simply send emails automatically. They deliver relevant information at the right time, helping subscribers move naturally from awareness to engagement and, eventually, conversion.
Start with one simple workflow, measure its performance, and improve it based on your subscribers’ behavior. As you become more comfortable with automation, you can build more advanced workflows for different segments and stages of the customer journey.




Your writing style is so engaging and easy to read It makes it a pleasure to read your blog and…
I was more than happy to search out this net-site.I needed to thanks for your time for this excellent learn!!…
Usually I do not read article on blogs, but I would like to say that this write-up very compelled me…
Hello, i believe that i noticed you visited my website thus i came to “return the choose”.I'm attempting to find…
Thanks for sharing. I read many of your blog posts, cool, your blog is very good.